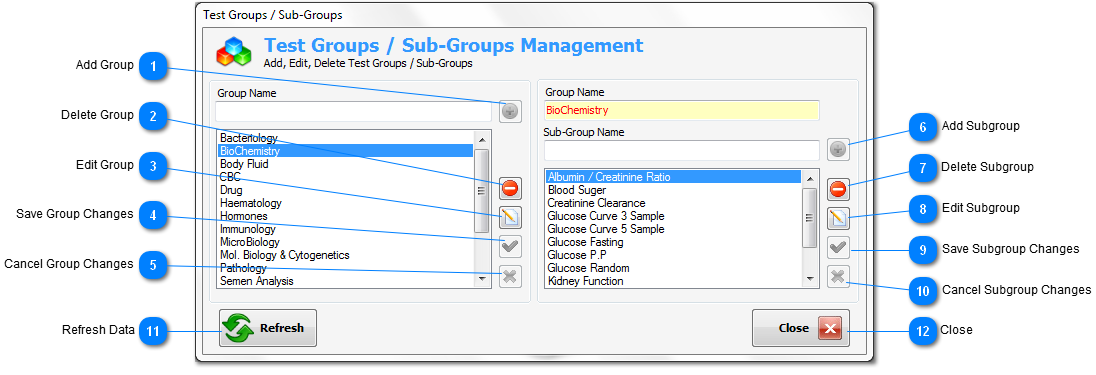
Test Groups / Sub Groups Management
From this
dialog window you can manage test groups / subgroups by add, edit,
or delete test group(s) / subgroup(s).
Test group /
subgroup is a virtual container for tests (like as folders in
windows) to simplify tests management.
For each group
you can add any number of subgroups.
Note : use
# character at the end of group / subgroup name to
hide it in the tests results report.

Add Group
Add the
entered group name to test groups list.
This button
will be enabled when you enter any characters in the group name
text field.
|
|
|

Delete Group
Delete the
selected group.
This button
will be enabled when you select any group.
|
|
|

Edit Group
Edit the
selected group.
This button
will be enabled when you select any group.
|
|
|

Save Group Changes
Save the
changes which made on the selected group.
This button
will be enabled after press edit.
|
|
|

Cancel Group Changes
Cancel changes
of the selected group.
This button
will be enable after press edit.
|
|
|

Add Subgroup
Add the
entered subgroup name to test subgroups list.
This button
will be enabled when you enter any characters in the subgroup name
text field.
|
|
|

Delete Subgroup
Delete the
selected subgroup.
This button
will be enabled when you select any subgroup.
|
|
|

Edit Subgroup
Edit the
selected subgroup.
This button
will be enabled when you select any subgroup.
|
|
|

Save Subgroup Changes
Save the
changes which made on the selected subgroup.
This button
will be enabled after press edit.
|
|
|

Cancel Subgroup Changes
Cancel changes
of the selected subgroup.
This button
will be enable after press edit.
|
|
|

Refresh Data
Update test
groups / subgroups list.
|
|
|

Close
Close dialog
window.
|
|
|