From this
window you can manage medical tests by add, edit, delete, copy,
past, or print test(s).
Also you can
manage the references list of each test by add, edit, delete test
reference(s).
The window left
side is a tree view which contains all the medical tests and its
groups / sub groups in a three levels :
The window
right side is the properties of the selected node (group, sub
group, or test) from the left side.
Group /
Sub group properties :
-
Group : name of
group.
-
Sub Group :
name of sub group if exist.
-
Act As Single
Test : make this group or sub group to act as test like as
CBC.
-
Linked To :
enabled only if act as single test is checked, to link this group
to another group like as shortcut link.
-
Sample :
enabled only if act as single test is checked, to describe the
sample of the test.
-
Price : enabled
only if act as single test is checked, price of the test
-
In Discount :
enabled only if act as single test is checked, if Yes (default)
then the price of this test will be under any applied discount, but
if No the price of this test will be as is without any
discount.
-
Comment : enter
any comment for this group / sub group, and you can get this
comment directly at group comment field in
Tests
Result window by press F1.
Test
properties :
-
Group : name of
group if test in level 2 or 3.
-
Sub Group :
name of sub group if test in level 3.
-
Test Name :
name of test.
-
Sample :
describe the sample of the test.
-
Duration :
number of days which the test need to be finished.
-
Price : price
of the test
-
Unit : unit
which measure the test.
-
In Discount
: if Yes (default) then the test price will be under any
applied discount, but if No then the test price will be as is
without any discount.
-
Comment : enter
any comment for this test, and you can get this comment directly at
test comment field in
Tests
Result window by press F1.
-
Fixed Reference
: a fixed reference, and if configured then it'll be set directly
at reference field of this test in
Tests
Result window.
-
Special Report
: if checked then you can configure a special report format for
this test.
-
References List
: it's a dynamic references list you can add, edit, or delete any
reference from it. If the fixed reference is not configured, then
the reference field for this test in
Test Result
window will extract its value from this dynamic list depending on
patient age and sex.
Group /
Sub group node right click menu :
-
Past Test :
past the last copy test into the selected group / sub group, and
this submenu item will be enabled after press copy test submenu
item.
-
Edit Group /
Sub Group : edit the selected group / sub group node.
-
Test
node right click menu :
-
Copy Test :
copy the selected test node.
-
Edit Test
: edit the selected test node.
-
Delete Test :
delete the selected test node, but if this test was linked to any
patients visits then you can not delete it because deleting it will
corrupt the linked data.
-
Forced Delete :
delete the selected test node regardless if it linked to any
recodes, but it's not recommend to use this command.

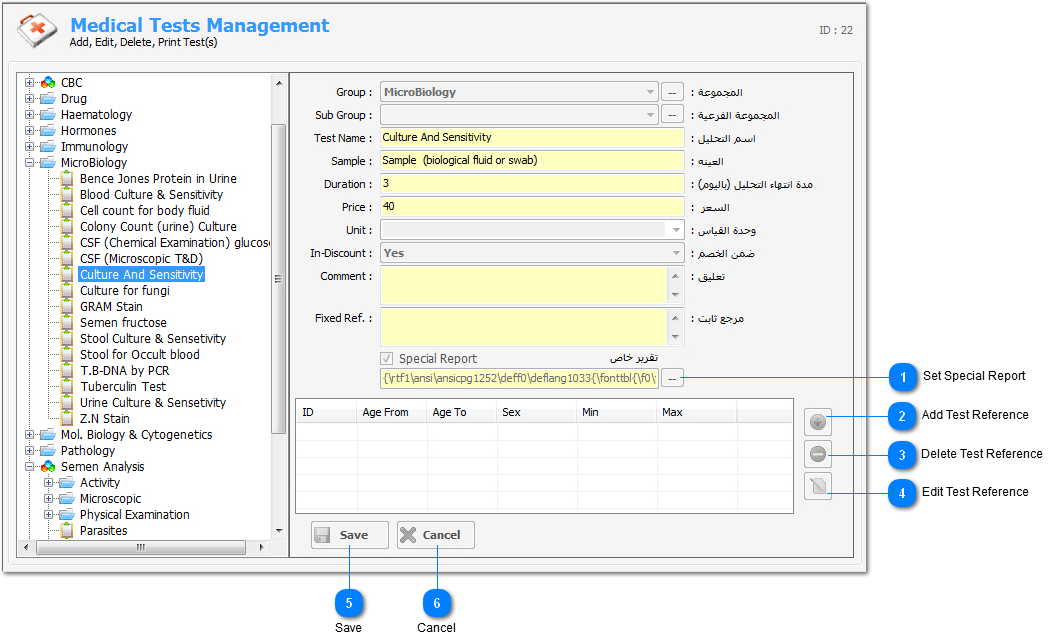
Set Special Report
This button
will be enabled after press new or edit test button from main
toolbar or right click menu of test node.
|
|
|

Add Test Reference
This button
will be enabled after press new or edit test button from main
toolbar or right click menu of test node.
|
|
|

Delete Test Reference
Delete the
selected test reference(s)
This button
will be enabled when you select test reference after press new or
edit test button from main toolbar or right click menu of test
node.
|
|
|

Edit Test Reference
This button
will be enabled when you select test reference after press new or
edit test button from main toolbar or right click menu of test
node.
|
|
|

Save
Save the
current test data.
This button
will be enabled after press new or edit test button from main
toolbar or right click menu of test node.
|
|
|

Cancel
Cancel any
changes made to the current test data.
This button
will be enabled after press new or edit test button from main
toolbar or right click menu of test node.
|
|
|